v4 AWS Quickstart
If you were redirected here after purchasing Senzing Entity Resolution in the AWS Marketplace , a license is emailed within 3 business days to the email address of the purchasing AWS account. In the meantime, follow the guide below to get started. Contact Senzing Support for any questions.
SENZING® SDK with ENTITY CENTRIC LEARNING® and SMARTER ENTITY RESOLUTION® technologies.
SENZING INSIDE™. CONNECT DATA. POWER INTELLIGENCE.™
Senzing is an Entity Resolution SDK that allows organizations to resolve and deduplicate records across multiple data sources. This AWS-specific deployment guide provides a structured approach for setting up Senzing v4 using Amazon EC2 and Amazon RDS (PostgreSQL or SQLite). Senzing is designed to be source and destination agnostic, meaning customers define their own ingestion and consumption patterns based on their enterprise architecture.
Senzing provides a free license for 500 source records when downloading the Senzing® SDK. If you subscribe to the free trial of Senzing Entity Resolution in the AWS Marketplace , you are provided a free license for 250k source records. If you require additional records for an evaluation, or any assistance when following this guide, contact Senzing Support . Support is 100% FREE!
SENZING® SDK with ENTITY CENTRIC LEARNING® and SMARTER ENTITY RESOLUTION® technologies.
SENZING INSIDE™. CONNECT DATA. POWER INTELLIGENCE.™
AWS deployment options
There are two options for deploying Senzing on AWS:
- SQLite-based Deployment (<1M records): Excellent for testing and the quickest no-dependency setup
- AWS PostgreSQL-based Deployment: Recommended for performance and scalability
SQLite-based deployment (<1M records)
Excellent for testing and the quickest no-dependency setup.
AWS PostgreSQL-based deployment
Recommended for performance and scalability.
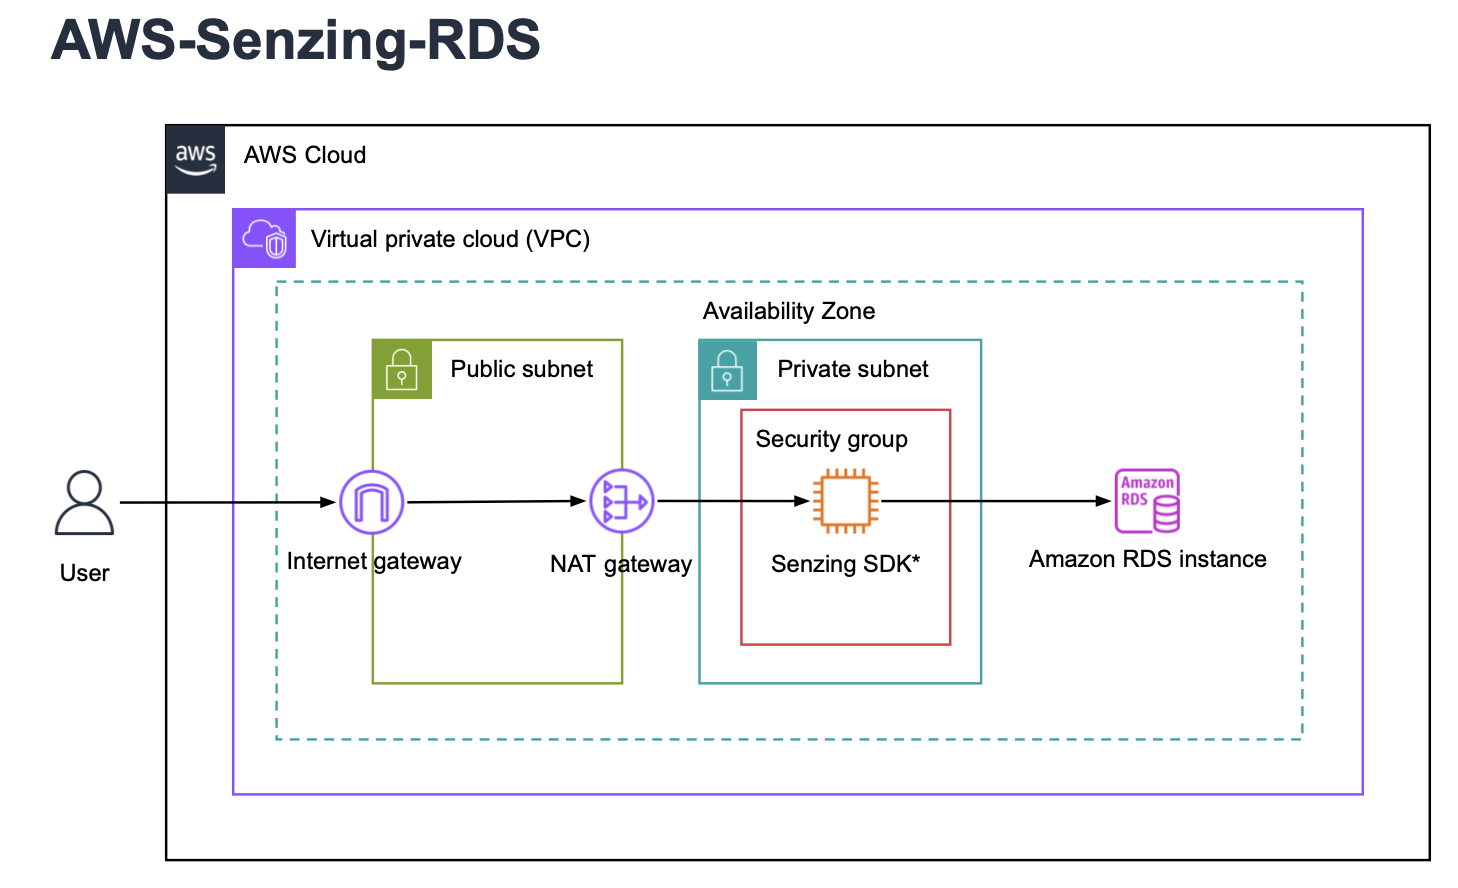
Security & data encryption
Senzing does not require root privileges and can be completely air-gapped and requires no connectivity beside to your database. Data security is managed by the customer’s AWS security policies. All data is stored in the customer’s controlled environment database.
Cost considerations
Cost Modeling: Compute EC2, RDS usage, Storage, Networking Data transfer costs
- Use the AWS EC2 Pricing Calculator to estimate your AWS cost.
Prerequisites
Before deploying Senzing on AWS, ensure you have:
- AWS Account with administrative privileges
- Basic Linux command-line knowledge
- Understanding of AWS IAM, EC2, and RDS
- Security best practices such as IAM role restrictions and least privilege access
AWS deployment instructions - SQLite and PostgreSQL
Step 1: Launch EC2 instance
- Open
AWS Console→EC2→Launch Instance - Choose an AMI:
Amazon Linux 2023+orUbuntu 22.04+ - Choose an instance type (minimum):
t3.large(<1M records) orm5.2xlarge - Configure Security Groups: Allow SSH from trusted IPs (22/tcp)
Step 2: Install Senzing SDK and test
- SSH into your EC2 instance
- Follow the Senzing v4 Linux Quickstart Guide
OPTIONAL: Connect to AWS PostgreSQL
Step 3: Launch an Aurora PostgreSQL cluster
- Go to
AWS Console→RDS→Create Database - Select
Amazon Aurora- Engine:
PostgreSQL - Instance:
m5.2xlarge - Version:
15+ recommended
- Engine:
- Configure Networking & Security
- Setup EC2 Connection
- Allow EC2 instances to connect
5432/tcp - Allow inbound from your trusted Admin IP for management
Step 4: Configure EC2 to connect to Aurora
- Retrieve the Aurora Cluster Endpoint:
aws rds describe-db-instances --query “DBInstances[*].Endpoint.Address”
- Allow EC2 instances to access Aurora in the security group:
- Go to
AWS Console→EC2→Security Groups - Edit the RDS security group
- Add an inbound rule allowing EC2 instances to access PostgreSQL
Port 5432
- Go to
- Test the database connection from EC2:
psql -h <AURORA_ENDPOINT> -U <DB_USER> -d <DB_NAME>
Step 5: Set up Senzing schema and connect to PostgreSQL
Senzing provides a detailed PostgreSQL setup guide that works for any environment and covers:
- Database schema creation
- Configuring connection parameters
- Updating the database with the Senzing ER Configuration
- Follow the Senzing PostgreSQL Database Setup Guide .
Step 6: Apply Aurora performance optimizations
- Follow the Tuning Your Database Aurora PostgreSQL instructions.
If you have any questions, contact Senzing Support. Support is 100% FREE!